> ## Documentation Index
> Fetch the complete documentation index at: https://help.teable.ai/llms.txt
> Use this file to discover all available pages before exploring further.
# Azure Entra ID SSO
> 配置 Azure Entra ID 作为 Teable 的 SSO 认证提供商
适用于商业版及以上版本
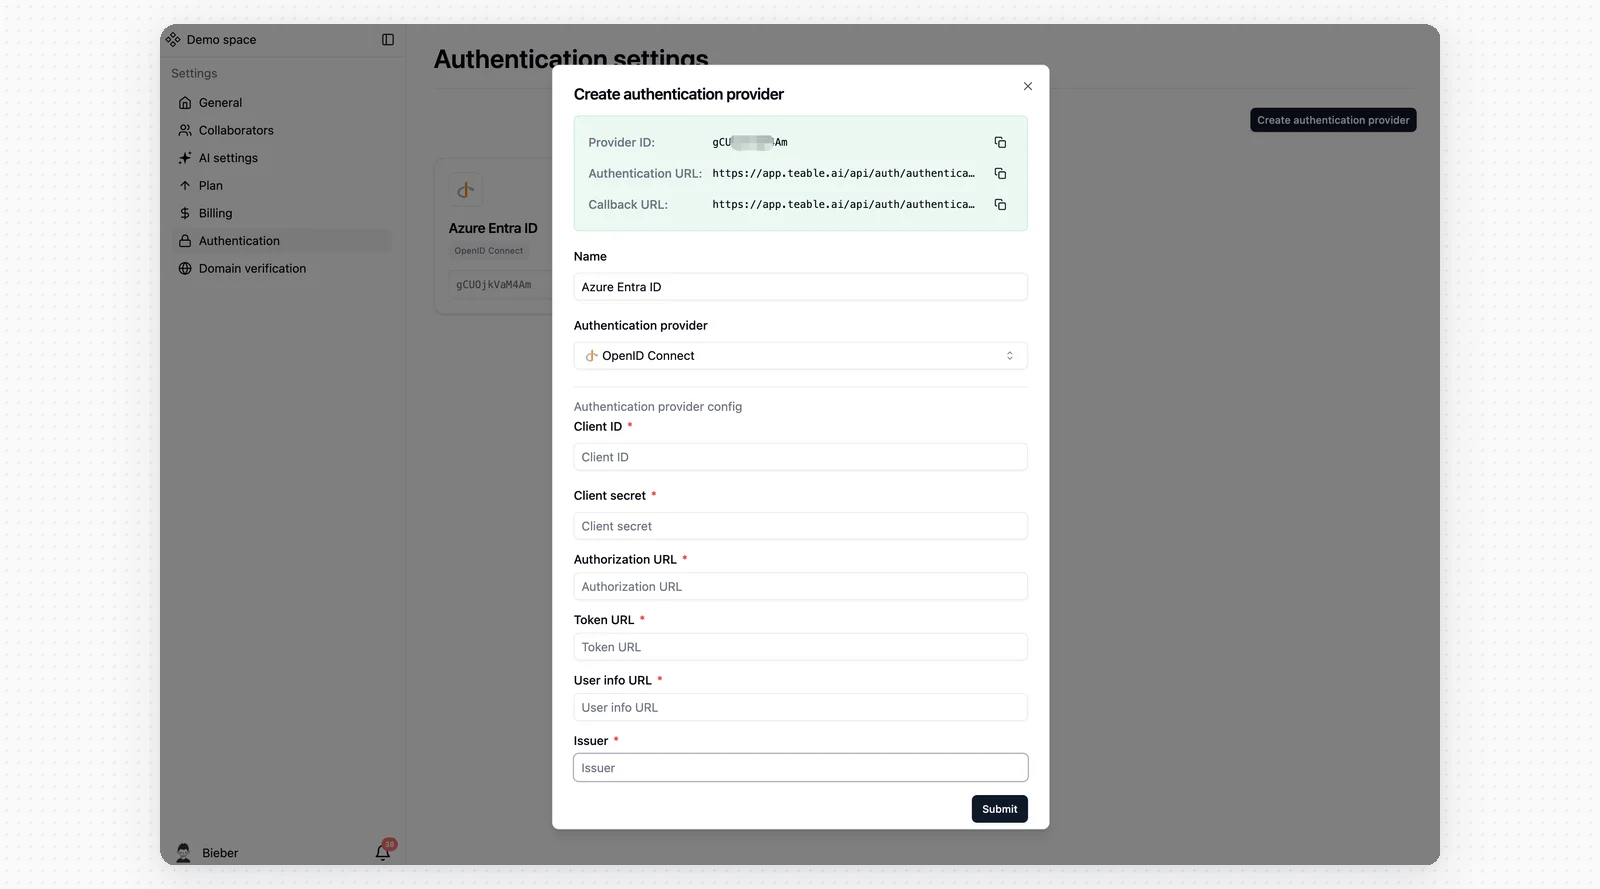
## 步骤 1:在 Teable 中创建认证提供商
1. 进入 Teable 的 SSO 设置页面
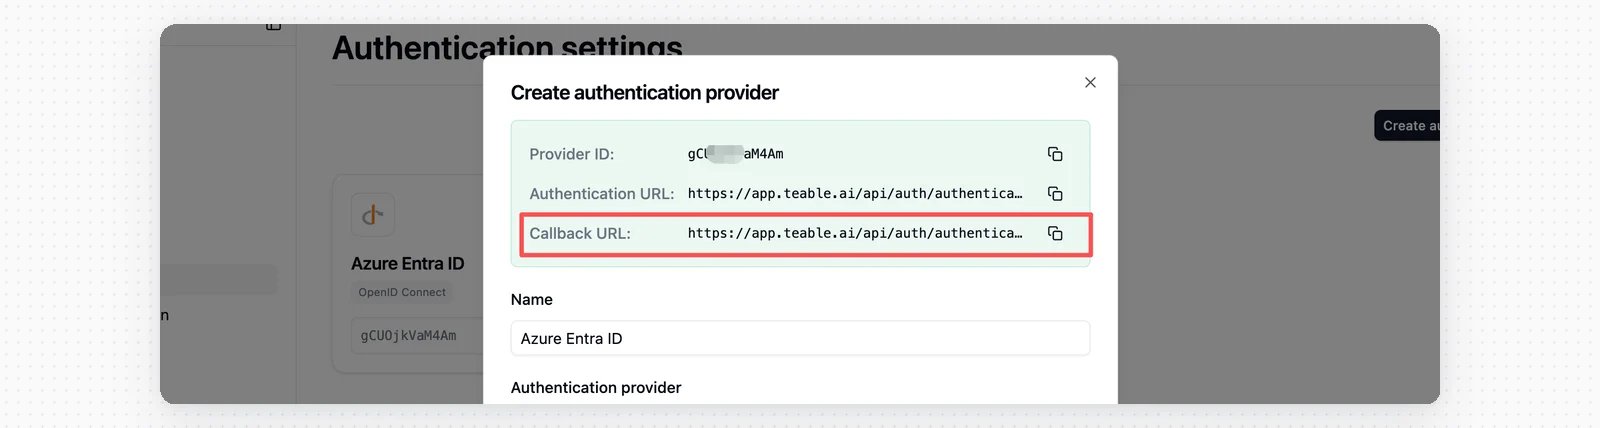
2. 创建新的认证提供商,命名为 **Azure Entra ID** 并选择 **OpenID Connect**
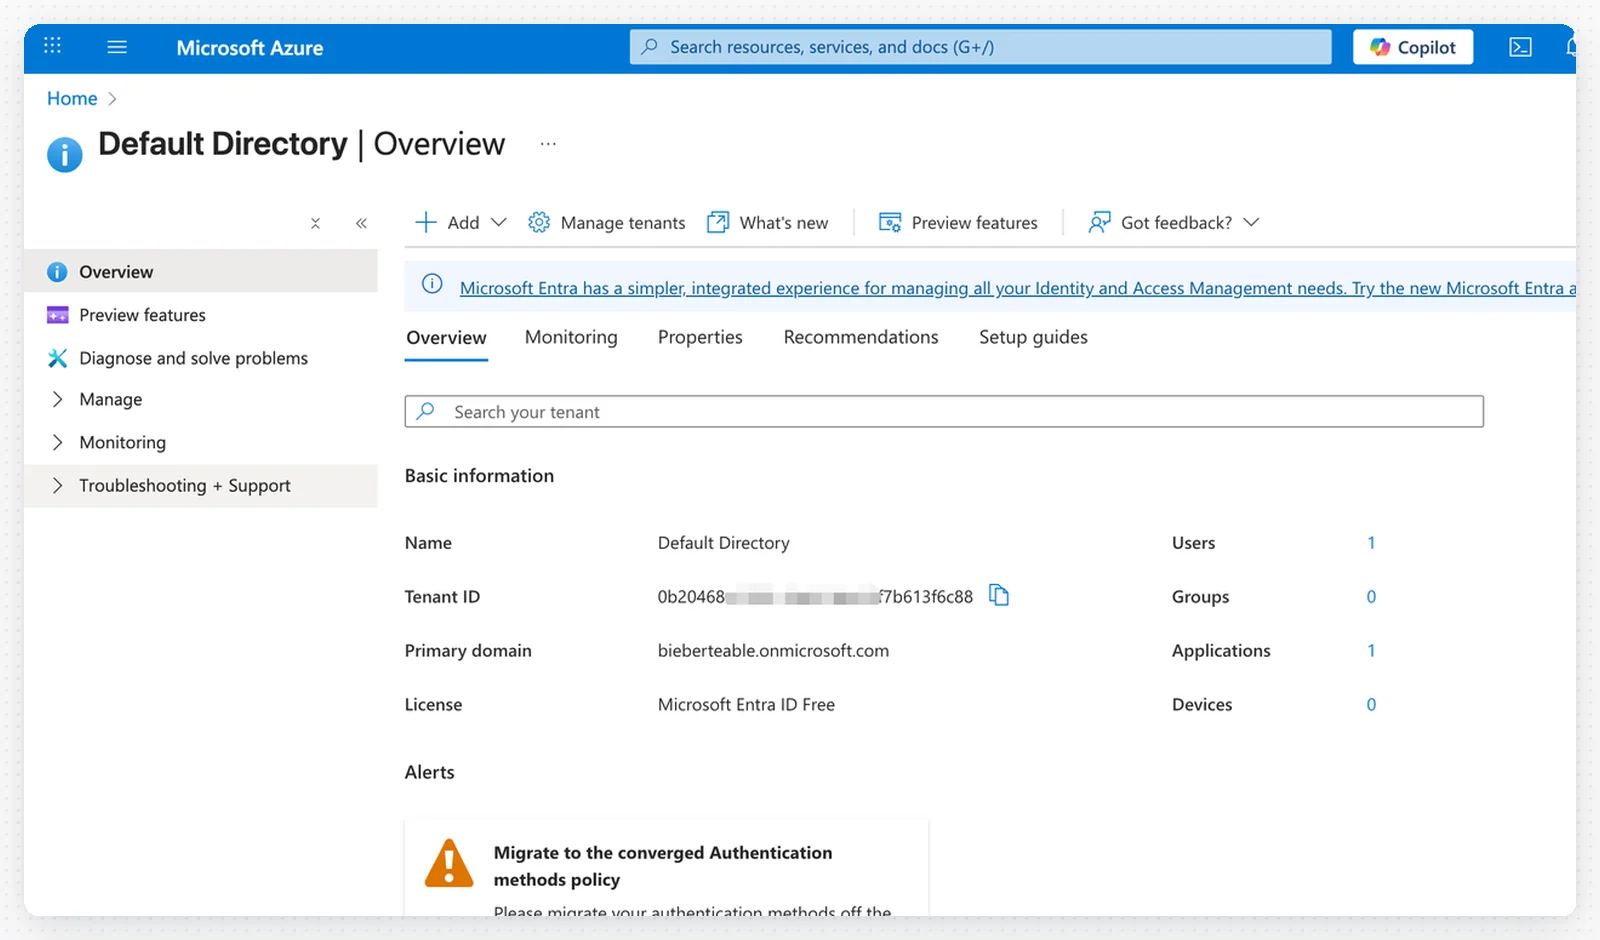
 ## 步骤 2:访问 Azure Entra ID
1. 登录你的 Azure 账户
2. 导航至 **Microsoft Entra ID**(原 Azure Active Directory)
## 步骤 2:访问 Azure Entra ID
1. 登录你的 Azure 账户
2. 导航至 **Microsoft Entra ID**(原 Azure Active Directory)
 ## 步骤 3:配置 OAuth 端点
使用你的 **租户 ID** 在 Teable 中填写以下 OAuth 端点:
## 步骤 3:配置 OAuth 端点
使用你的 **租户 ID** 在 Teable 中填写以下 OAuth 端点:
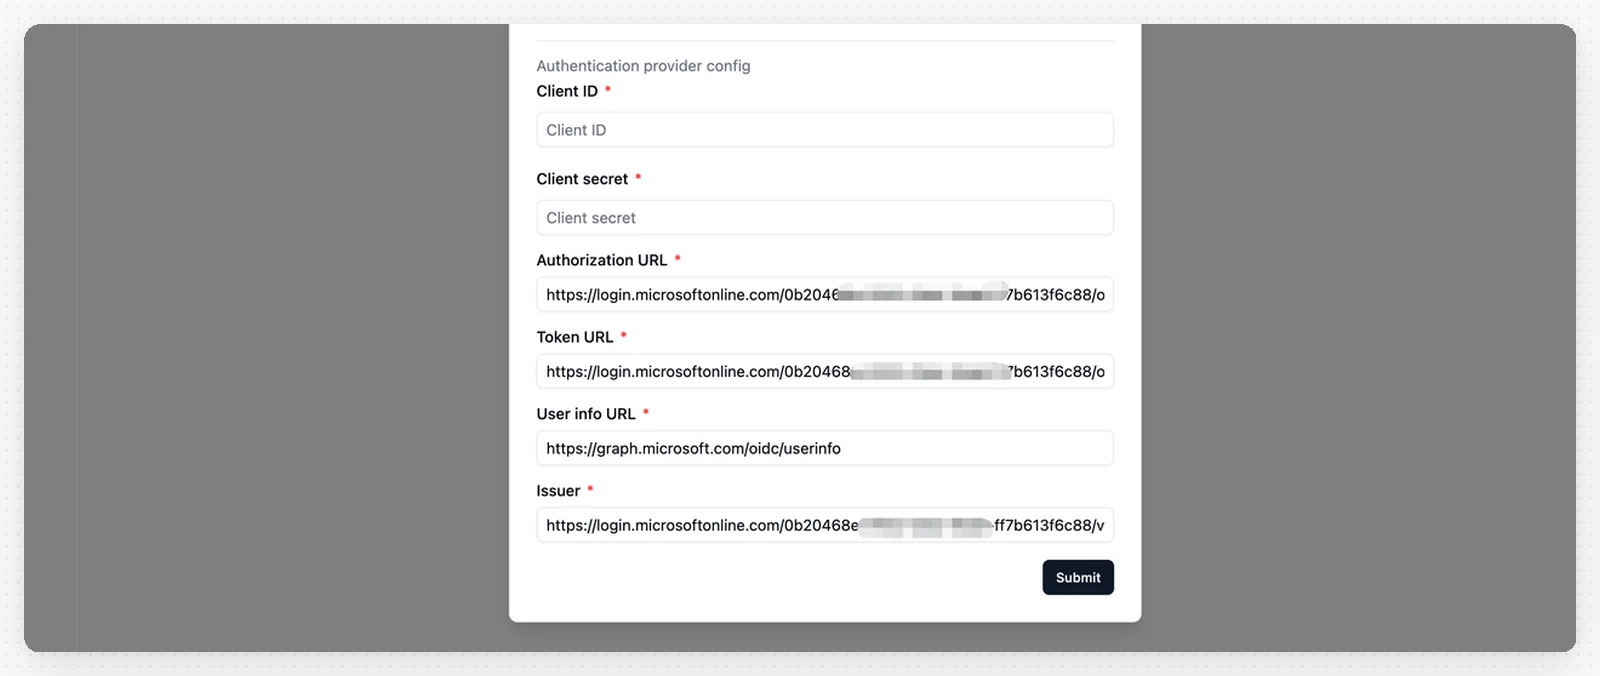 * **Authorization URL**(授权 URL):`https://login.microsoftonline.com/_YOUR_TENANT_ID_/oauth2/v2.0/authorize`
* **Token URL**(令牌 URL):`https://login.microsoftonline.com/_YOUR_TENANT_ID_/oauth2/v2.0/token`
* **User Info URL**(用户信息 URL):`https://graph.microsoft.com/oidc/userinfo`
* **Issuer**(颁发者):`https://login.microsoftonline.com/_YOUR_TENANT_ID_/v2.0`
请将 `_YOUR_TENANT_ID_` 替换为你的实际 Azure 租户 ID。
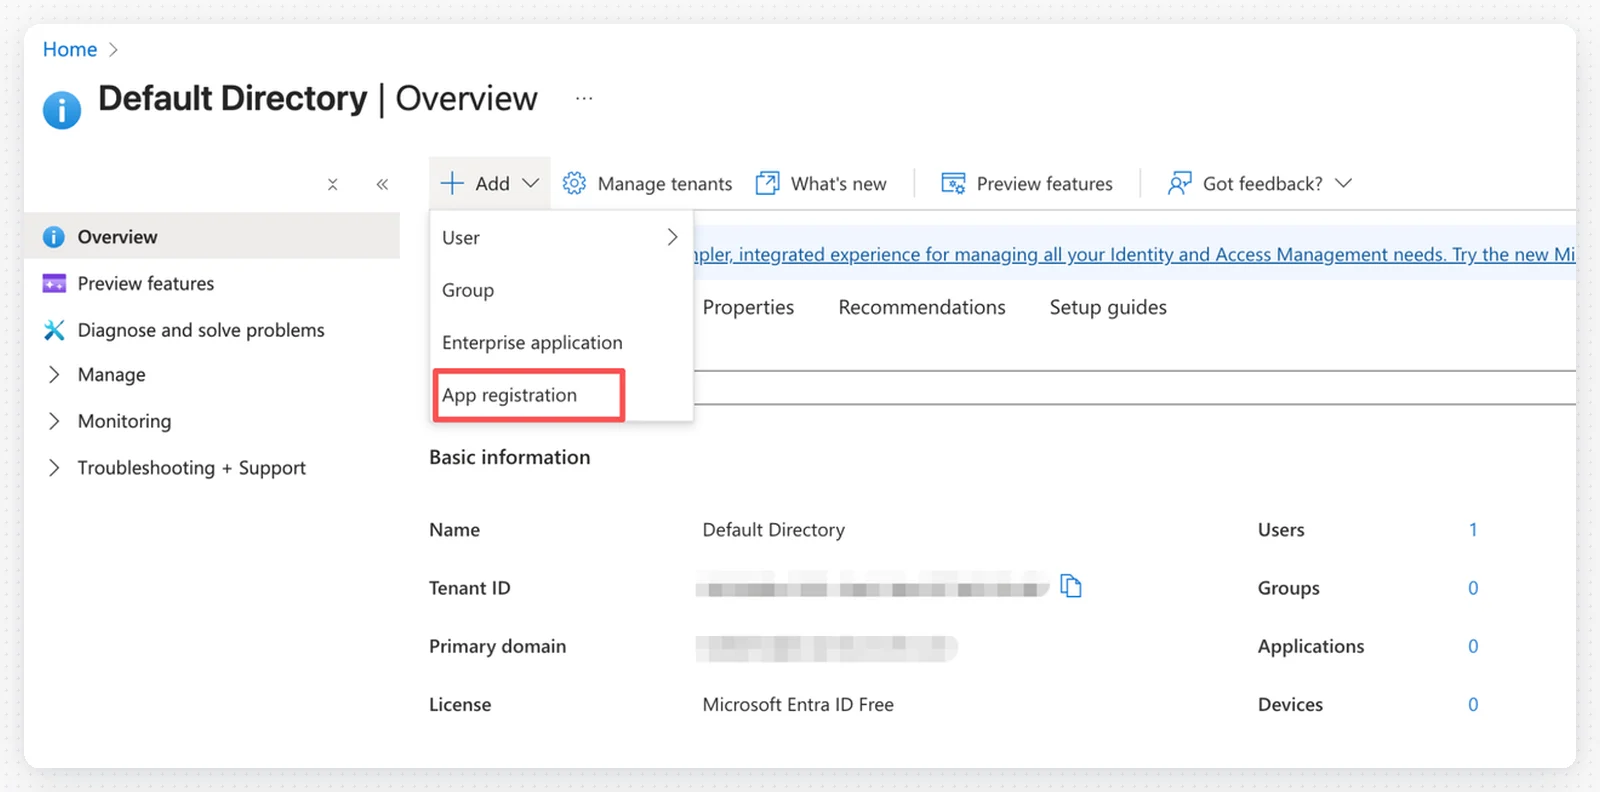
## 步骤 4:注册新应用程序
1. 在 Azure Entra ID 中,点击左侧菜单的 **应用注册**
2. 点击 **+ 新注册**
* **Authorization URL**(授权 URL):`https://login.microsoftonline.com/_YOUR_TENANT_ID_/oauth2/v2.0/authorize`
* **Token URL**(令牌 URL):`https://login.microsoftonline.com/_YOUR_TENANT_ID_/oauth2/v2.0/token`
* **User Info URL**(用户信息 URL):`https://graph.microsoft.com/oidc/userinfo`
* **Issuer**(颁发者):`https://login.microsoftonline.com/_YOUR_TENANT_ID_/v2.0`
请将 `_YOUR_TENANT_ID_` 替换为你的实际 Azure 租户 ID。
## 步骤 4:注册新应用程序
1. 在 Azure Entra ID 中,点击左侧菜单的 **应用注册**
2. 点击 **+ 新注册**
 ## 步骤 5:配置应用程序注册
填写应用程序注册表单:
## 步骤 5:配置应用程序注册
填写应用程序注册表单:
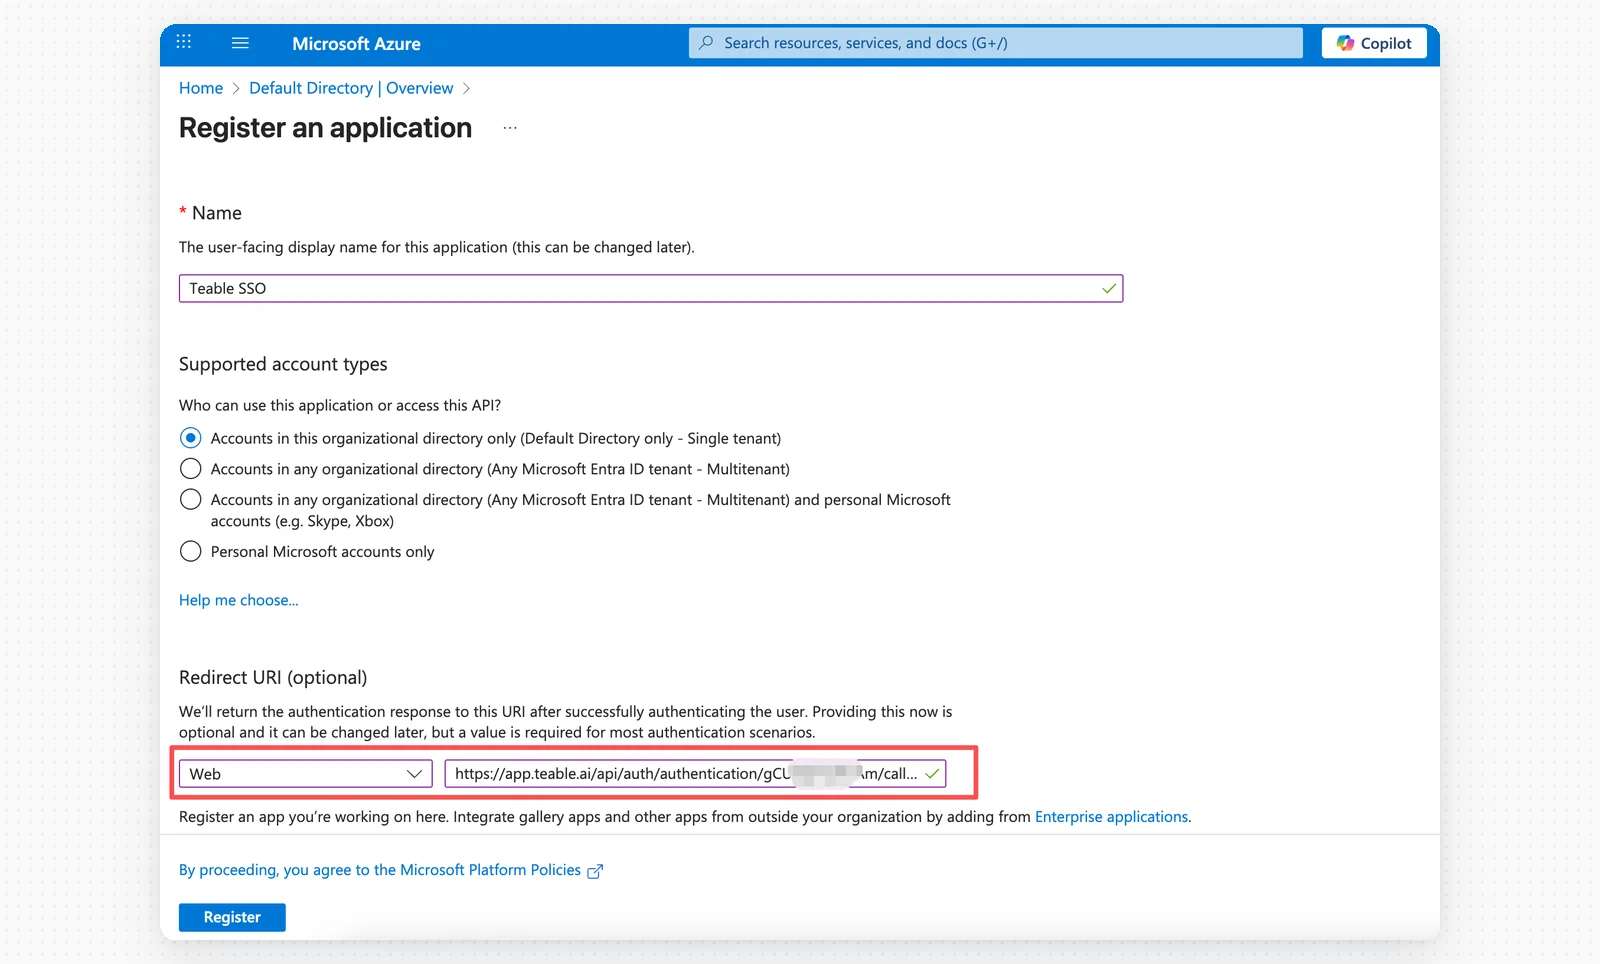
 * **名称**:Teable SSO
* **受支持的账户类型**:根据你的需求选择
* **平台**:Web
* **重定向 URI**:粘贴 Teable 中的**回调 URL**
点击**注册**以创建应用程序。
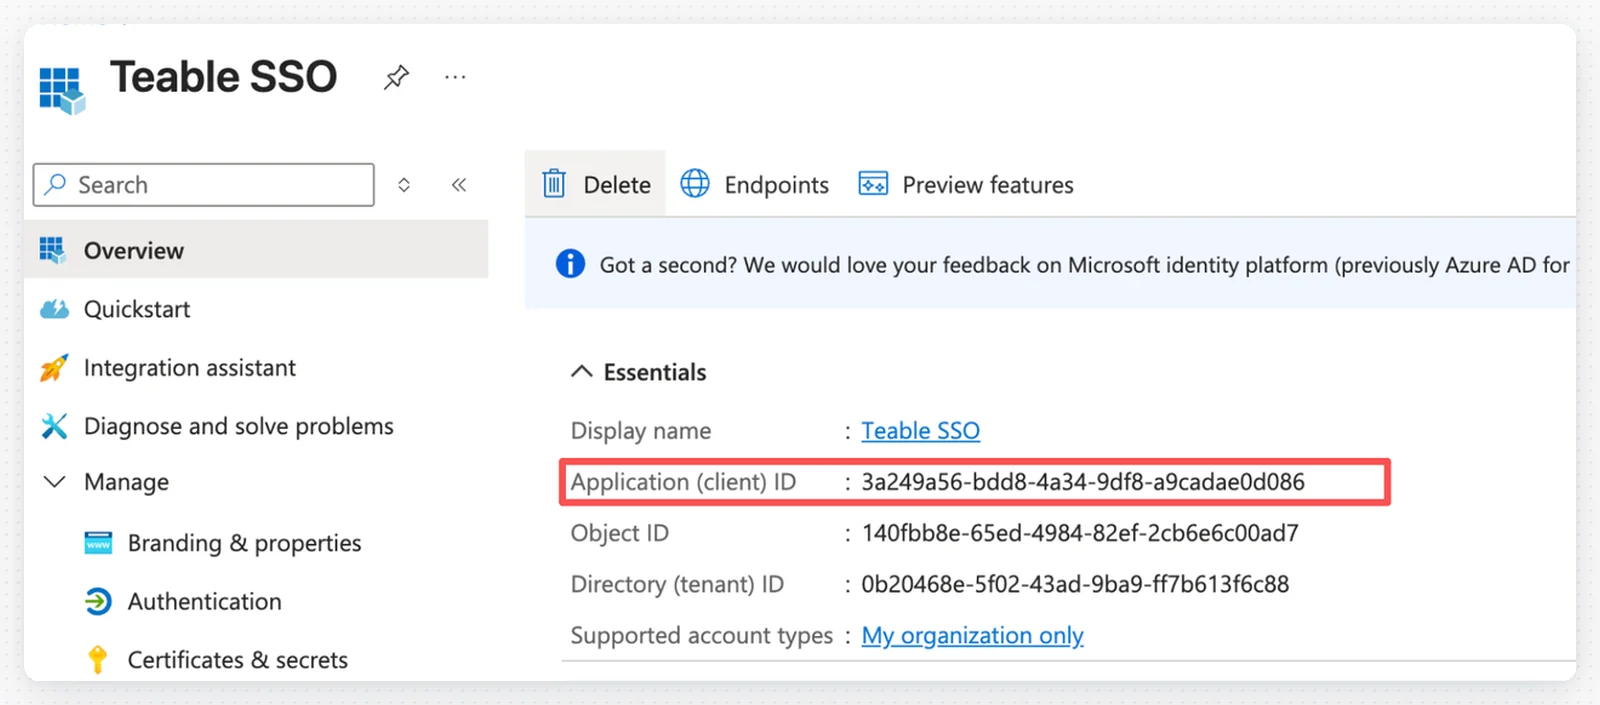
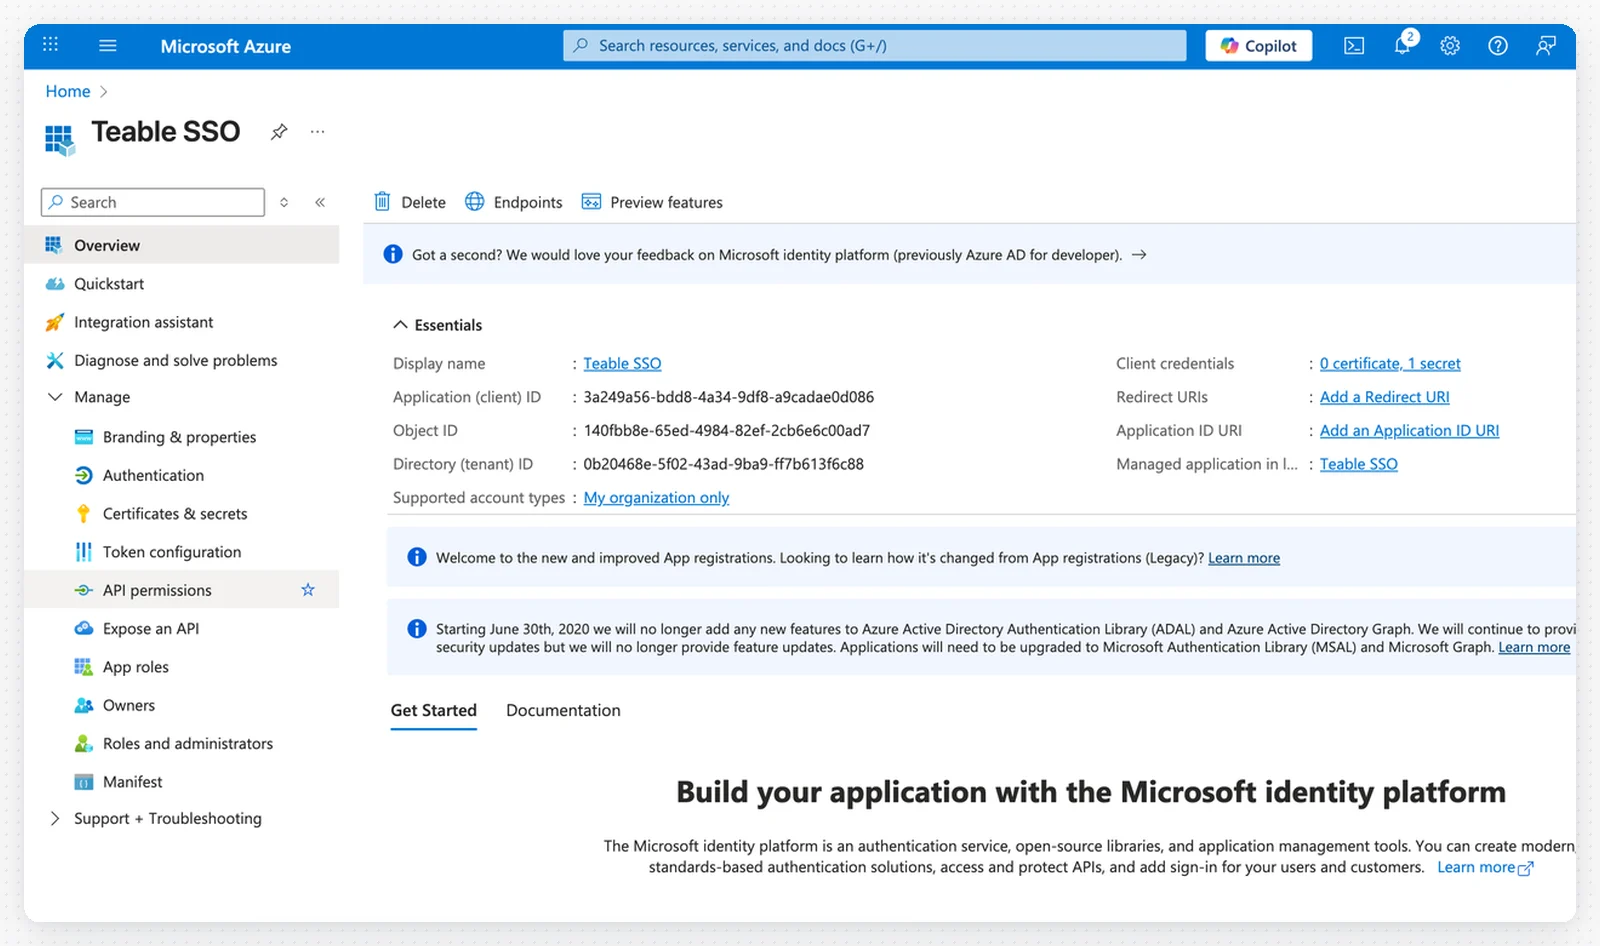
## 步骤 6:保存客户端 ID
1. 从应用程序概述页面复制**应用程序(客户端)ID**
* **名称**:Teable SSO
* **受支持的账户类型**:根据你的需求选择
* **平台**:Web
* **重定向 URI**:粘贴 Teable 中的**回调 URL**
点击**注册**以创建应用程序。
## 步骤 6:保存客户端 ID
1. 从应用程序概述页面复制**应用程序(客户端)ID**
 2. 将客户端 ID 粘贴到 Teable 的 SSO 配置中
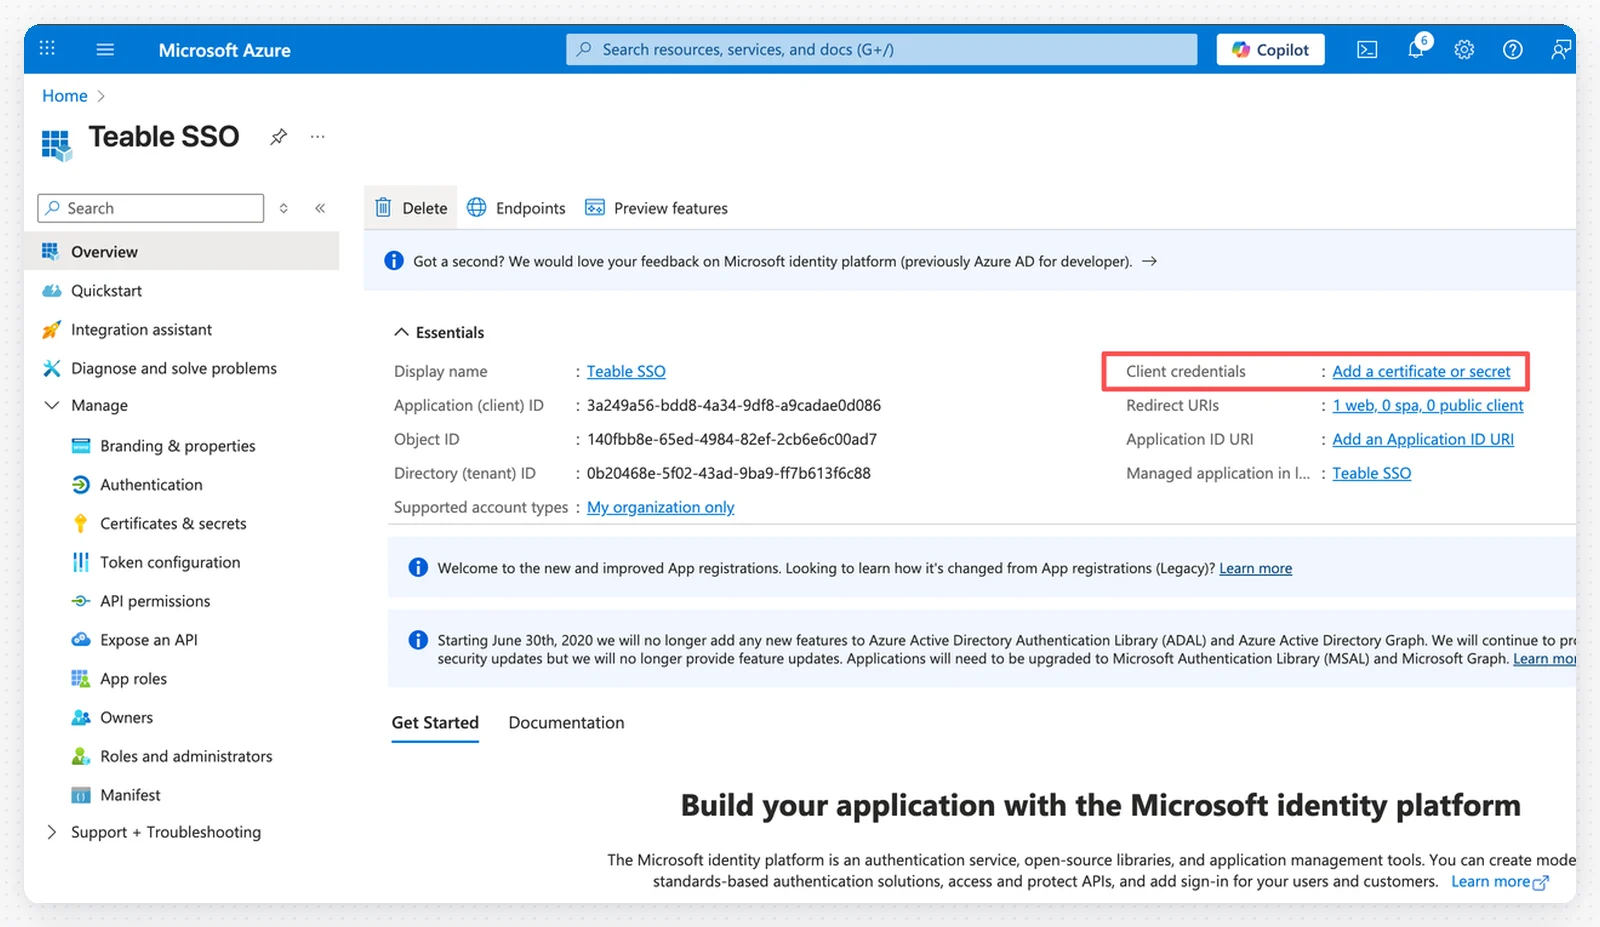
 ## 步骤 7:创建客户端密钥
1. 在你的应用程序中,点击左侧菜单的**证书和密钥**
## 步骤 7:创建客户端密钥
1. 在你的应用程序中,点击左侧菜单的**证书和密钥**
 2. 点击 **+ 新客户端密钥**
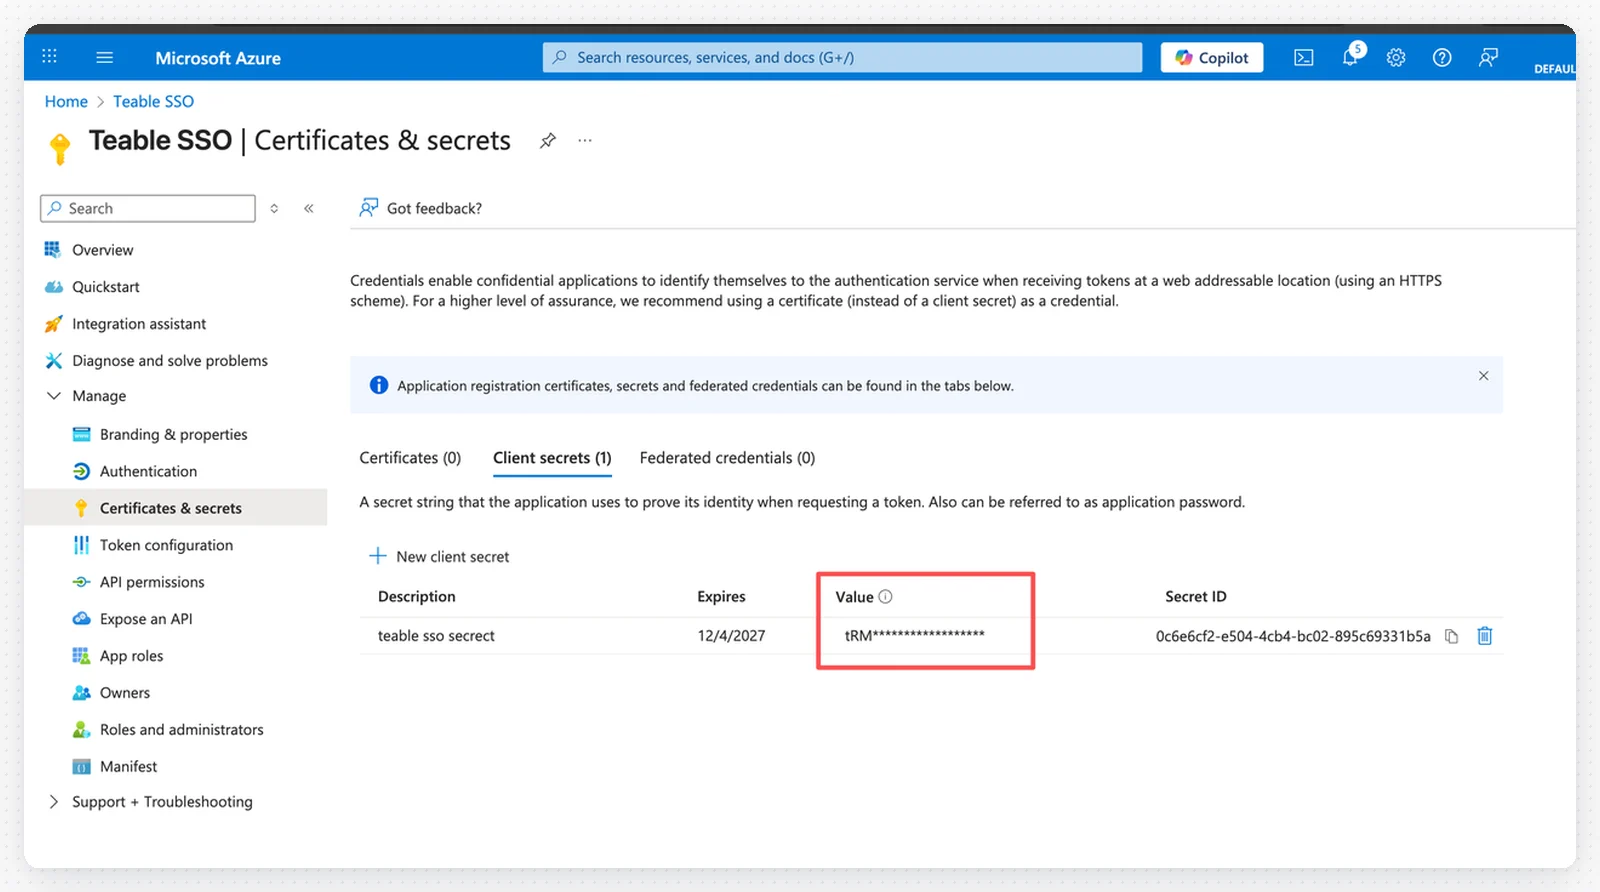 3. 添加说明并设置过期时间
4. 点击**添加**
5. **重要**:立即复制密钥的**值**并将其保存为 Teable 中的客户端密钥
3. 添加说明并设置过期时间
4. 点击**添加**
5. **重要**:立即复制密钥的**值**并将其保存为 Teable 中的客户端密钥
 密钥值仅显示一次,请务必立即保存。
## 步骤 8:配置 API 权限
1. 点击左侧菜单中的 **API 权限**
2. 点击 **+ 添加权限**
密钥值仅显示一次,请务必立即保存。
## 步骤 8:配置 API 权限
1. 点击左侧菜单中的 **API 权限**
2. 点击 **+ 添加权限**
 3. 选择 **Microsoft Graph**
4. 选择**委托的权限**
5. 添加以下权限:
* `email`
* `openid`
* `profile`
6. 点击**添加权限**
3. 选择 **Microsoft Graph**
4. 选择**委托的权限**
5. 添加以下权限:
* `email`
* `openid`
* `profile`
6. 点击**添加权限**
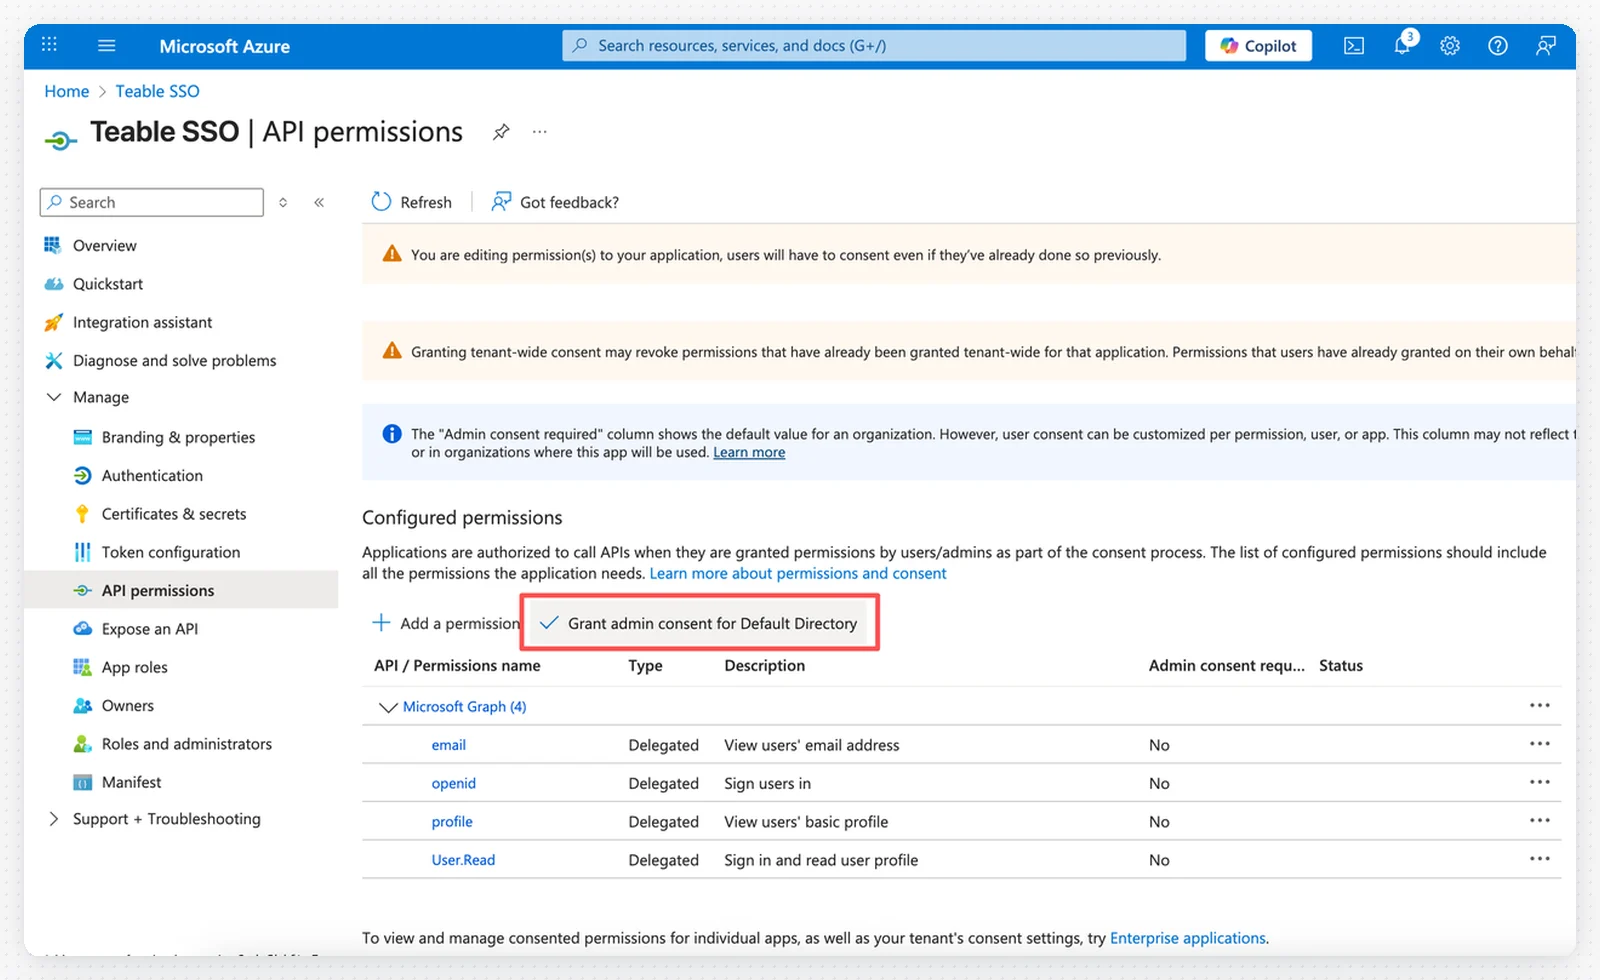 7. 点击**为 \[你的目录] 授予管理员同意**按钮以批准权限
## 步骤 9:测试 SSO 登录
你有两种方式启用 SSO 登录:
**方式 1:直接使用认证 URL**
* 直接使用认证 URL 作为你的 SSO 登录 URL
**方式 2:域名验证**
1. 点击左侧菜单中的**域名验证**
2. 验证你的自定义域名
3. 访问 [https://app.teable.cn](https://app.teable.cn)
4. 点击 SSO 登录按钮
5. 输入已验证域名下的电子邮件地址以登录
7. 点击**为 \[你的目录] 授予管理员同意**按钮以批准权限
## 步骤 9:测试 SSO 登录
你有两种方式启用 SSO 登录:
**方式 1:直接使用认证 URL**
* 直接使用认证 URL 作为你的 SSO 登录 URL
**方式 2:域名验证**
1. 点击左侧菜单中的**域名验证**
2. 验证你的自定义域名
3. 访问 [https://app.teable.cn](https://app.teable.cn)
4. 点击 SSO 登录按钮
5. 输入已验证域名下的电子邮件地址以登录